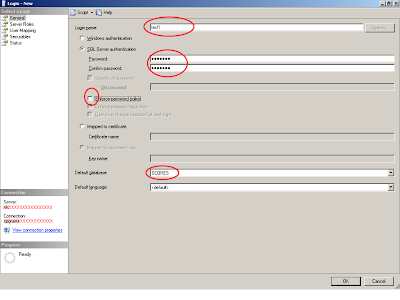
1. Launch SQL Server Management Studio.
2. At the top level, expand the “Security” tree node.
3. Next, right-click the “Logins” tree node.
4. Select New Login…
5. Under the “General” Tab in the left-hand explorer panel, type in the new login name in the left pane textbox such as “TestUser”.
6. For SQL Server Authentication, type in a password.
a. Note, if the “Enforce password policy” is checked, then you must provide a strong password value, such as “alen$123” (recommended). If you do not wish to provide a strong password, then uncheck the “Enforce password policy” checkbox.
b. Uncheck “Enforce Password Expiration” and “User must change password at next login” is unchecked.

7. Select the database as "SCORES" [YourDatabaseName].
8. Keep the default language as
9. Next, while still in the “Login – New” window, click on the “User Mapping” node in the right-hand explorer panel.
10. Check the check box in the “Map” column of the database(s) that you want your login to map to. Check the “SCORES” database.
11. You may leave the “Default Schema” blank since it will default to “dbo”, however you can also type in “dbo” or click the ellipsis button to navigate and select the object schema you wish to use.

12. Click Ok.
13. To verify the set-up, go to the Northwind database node and expand it.
14. Expand that database and expand the “Security” node. There you will see the new Login “Test1” as a valid login for the Northwind database.
Note:
Under this node, you should see the newly created and mapped login. This login only gives access to the database, but does not give any select, update, or delete types of permissions, nor does it enable this login to execute or modify any stored procedures. To set this up, follow the next step.
How to set up logins with Schemas (SQL Server 2005)
Notice in SQL Server Mangement Studio that the tables and the stored procedures inside the database are referenced like so:
dbo.TableName
What this indicates is that the dbo is the schema name. A schema in SQL Server is a namespace or container that contains objects. Those objects are tables, stored procedures, etc. So, with our schema, we can ADD a user, and then give the appropriate permissions on that schema, which will trickle down to all the objects inside that schema. This really is, in essence, equivalent to a global permission setting for the user(s) of all objects inside the schema. To accomplish this follow these steps:
1. Expand the SCORES database.
2. Expand the Security node in the SCORES database
3. Expand the Schemas node
4. Find the “dbo” schema and right click it and select Properties
5. From the Schema Properties dialog, click the “Permissions” node.
6. Under the “Users or roles” area, click the “Add…” button.
7. Select the user or role objects (in this case, we’ll select the “TestUser” user object which is the mapped login we created in the previous section of step 5).
8. Click OK, then OK again.
9. From here, you will see in the “Explicit Permissions for user
10. Click OK.
What his accomplishes for this user set example is we granted all these permission for this user without having to go into each table/stored procedure and picking the permissions at that table/stored procedure level. We specified the permissions at the schema level and that cascades down to all the objects inside that schema container.
Enable basic permissions for tables (Optional)
1. To enable permissions on a table, go to the database and expand the “Tables” tree node.
2. Right-click the table you want to give the new login permissions to and select “Properties”.
3. Click the “Permissions” tab in the Table Properties Window.
4. Under the “Users or roles:” section, you may or may not see any objects listed, but will not see the new login user we created earlier. Under this section, click the “Add” button.
5. The “Select Users or Roles” window will appear. Click the “Browse” button.
6. A “Browse for Objects” window should appear with a listing of all objects that match for this database. You should see our new login user since we mapped it to this database. Check the check box by that new user and click OK.
7. Click Ok again and the “Explicit persmissions for
8. Click OK.
